
Backup your Photos from your iPhone to the Photos app on Windows 11.
Creation date: 4/25/2025 8:26 AM
Updated: 4/25/2025 8:26 AM
How to backup your photos from your iPhone to the Photos app on Windows 11.
To back up your photos from your iPhone to the Photos app on Windows 11, follow these steps (you can also follow this 2 minute video if you prefer - https://www.youtube.com/watch?v=6yTRDxqw4l4 (right-click this link and select "open link in a new tab"):
Connect Your iPhone:
Use a USB cable (the one you charge your phone with works) to connect your iPhone to your Windows 11 PC. Make sure your iPhone is unlocked and you tap Trust or Allow if prompted to allow the PC to access your device.
Open the Photos App:
On your laptop, search or click on the Start button and type Photos to open the Photos app. This app is pre-installed on Windows 11.
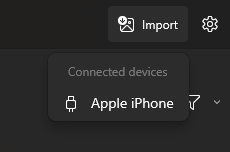
Import Photos:
In the Photos app, click on the Import button located at the top right corner.
Select Apple iPhone. Your PC will start searching for connected devices.
Select Photos to Transfer:
Once your iPhone is detected, you’ll see a preview of the photos available for import. You can select individual photos or choose to import all new items.
After making your selections, click on the Add button.
Wait for the Transfer:
Allow the transfer process to complete. This may take a few minutes depending on the number of photos. A progress bar will indicate how much time is remaining.
Check Your Photos:
Once the import is finished, you can find your photos in the Pictures folder on your PC, organized in a dated folder.
Additional Tips
Keep Your iPhone Unlocked: Ensure your iPhone remains unlocked during the transfer to avoid interruptions.